
spring boot集成rabbitmq
spring boot集成rabbitmq
什么是消息队列
MQ全称为Message Queue,即消息队列。“消息队列”是在消息的传输过程中保存消息的容器。它是典型的:生产者、消费者模型。生产者不断向消息队列中生产消息,消费者不断的从队列中获取消息。因为消息的生产和消费都是异步的,而且只关心消息的发送和接收,没有业务逻辑的侵入,这样就实现了生产者和消费者的解耦。
开发中消息队列通常有如下应用场景:
1、任务异步处理:
高并发环境下,由于来不及同步处理,请求往往会发生堵塞,比如说,大量的insert,update之类的请求同时到达MySQL,直接导致无数的行锁表锁,甚至最后请求会堆积过多,从而触发too many connections错误。通过使用消息队列,我们可以异步处理请求,从而缓解系统的压力。将不需要同步处理的并且耗时长的操作由消息队列通知消息接收方进行异步处理。减少了应用程序的响应时间。
2、应用程序解耦合:
MQ相当于一个中介,生产方通过MQ与消费方交互,它将应用程序进行解耦合。
AMQP和JMS
MQ是消息通信的模型,并发具体实现。现在实现MQ的有两种主流方式:AMQP、JMS。
两者间的区别和联系:
JMS是定义了统一的接口,来对消息操作进行统一;AMQP是通过规定协议来统一数据交互的格式
JMS限定了必须使用Java语言;AMQP只是协议,不规定实现方式,因此是跨语言的。
JMS规定了两种消息模型;而AMQP的消息模型更加丰富
rabbitmq的六种模式,两大类以及使用场景
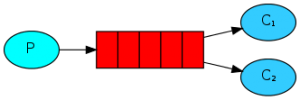
1.生产者 —-队列 —-消费者
simple简单模式
为一个队列中一条消息,只能被一个消费者消费。
1. 将发送验证码放入队列中
![]()
Work工作模式
为一个生产者,多个消费者,每个消费者获取到的消息唯一。
1. 有一个电商平台,有两个订单服务,用户下单的时候,任意一个订单服务消费用户的下单请求生成订单即可。不用两个订单服务同时消费用户的下单请求。
2. 对于 任务过重或任务较多情况使用工作队列可以提高任务处理的速度
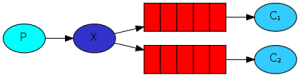
2.生产者—–交换机 —-队列 —-消费者
publish/subscribe订阅模式
为一个生产者发送的消息被多个消费者获取。
1. 用户通知,当用户充值成功或转账完成系统通知用户,通知方式有短信等多种方法 。比如邮件群发,群聊天,广告等。
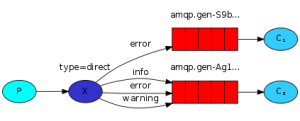
routing路由模式
为生产者发送的消息主要根据定义的路由规则决定往哪个队列发送。
1. 如在商品库存中增加了1台iphone12,iphone12促销活动消费者指定routing key为iphone12,只有此促销活动会接收到消息,其它促销活动不关心也不会消费此routing key的消息 对应的key类型进行发送数据
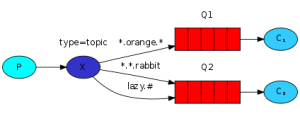
topic 主题模式
为生产者,一个交换机(topicExchange),模糊匹配路由规则,多个队列,多个消费者。
1.路由模式的效率是高于主题模式,实际工作中可以使用路由模式解决的问题就尽量不要采用主题模式。
RPC模式
生产者,多个消费者,路由规则,多个队列 总结 一个队列,一条消息只会被一个消费者消费(有多个消费者的情况也是一样的)。
交换机
RabbitMQ包含四种不同的交换机类型:
1.Direct exchange:直连交换机,转发消息到routigKey指定的队列
2. Fanout exchange:扇形交换机,转发消息到所有绑定队列(速度最快)
3.Topic exchange:主题交换机,按规则转发消息(最灵活)
springboot集成rabbitmq
pom导入
            org.springframework.boot
            spring-boot-starter-amqp
application.yml
spring:
  rabbitmq:
    host: 127.0.0.1
    port: 5672
    username: admin #账号
    password: admin #密码
    virtual-host: /
    listener:
      simple:
        #acknowledge-mode: manual #设置确认模式手工确认
        concurrency: 3 #消费者最小数量
        max-concurrency: 10 # 消费者最大数量
        publisher-returns: true  #开启return模式
        publisher-confirm-type: correlated  #开启confirm模式  旧的jar是 publisher-confirms: true
1.实现simple简单模式
定义队列 创建rabbitmq_simple 队列
import org.springframework.amqp.core.Queue;
import org.springframework.amqp.support.converter.Jackson2JsonMessageConverter;
import org.springframework.amqp.support.converter.MessageConverter;
import org.springframework.context.annotation.Bean;
import org.springframework.context.annotation.Configuration;

import java.util.HashMap;
import java.util.Map;


/**
 * @author :hjx
 * @date :Created in 2022/3/28 11:38
 */
@Configuration
public class RabbitMQConfig {

    /**
     * type  1 simple简单模式为一个队列中一条消息,只能被一个消费者消费。
     */
    @Bean
    public Queue simpleQueue(){
        // durable:是否持久化,默认是false,持久化队列:会被存储在磁盘上,当消息代理重启时仍然存在,暂存队列:当前连接有效
        // exclusive:默认也是false,只能被当前创建的连接使用,而且当连接关闭后队列即被删除。此参考优先级高于durable
        // autoDelete:是否自动删除,当没有生产者或者消费者使用此队列,该队列会自动删除。
        //   return new Queue("rabbitmq_simple",true,true,false);


        return new Queue("rabbitmq_simple",true,false,false);
    }

}
创建生产者 simple简单模式
import org.springframework.amqp.rabbit.core.RabbitTemplate;
import org.springframework.beans.factory.annotation.Autowired;
import org.springframework.web.bind.annotation.RequestMapping;
import org.springframework.web.bind.annotation.RestController;
import java.util.HashMap;
import java.util.Map;
import java.util.Optional;

/**
 * @author :hjx
 * @date :Created in 2022/3/23 11:05
 */

@RestController
@RequestMapping(value ="/Test1")
public class Test1Controller {
    @Autowired
    private RabbitTemplate rabbitTemplate;
    @RequestMapping("/testMQ")
    public String testMQ() {
        Map msgMap = new HashMap<>();
            msgMap.put("key", "rabbitmq_simple");
        /*   MessagePostProcessor msg = message -> {
                message.getMessageProperties().getHeaders().put("da","123");
                message.getMessageProperties().setExpiration("10000"); //失效时间
                return message;
            };*/

            //设置失效时间 以及通过MessagePostProcessor 传入headers参数
           /* rabbitTemplate.convertAndSend("rabbitmq_simple", msgMap,msg );*/
        //只发送
          rabbitTemplate.convertAndSend("rabbitmq_simple", msgMap);
          //发送后  接收数据
          //rabbitTemplate.convertSendAndReceive("rabbitmq_simple", msgMap);
        return "200";
    }
创建消费者
import com.rabbitmq.client.Channel;
import org.springframework.amqp.core.ExchangeTypes;
import org.springframework.amqp.core.Message;
import org.springframework.amqp.rabbit.annotation.*;
import org.springframework.amqp.support.AmqpHeaders;
import org.springframework.messaging.handler.annotation.Header;
import org.springframework.stereotype.Component;


import java.io.IOException;
import java.util.Map;
import java.util.Optional;

//消费者
@Component
public class Consumer {
    @RabbitHandler
    @RabbitListener(queues="rabbitmq_simple")
    public void process(Message msg, Map msgMap, Channel channel, @Header(AmqpHeaders.DELIVERY_TAG) long tag) throws IOException {

        System.out.println("消费者消费消息simple=====" + msgMap.toString());
    }
    }
通过调用会发现发送的数据
使用默认jdk的序列化方式,现在我们知道了上面这个问题是如何产生了的,那么该如何解决呢?
通过创建RabbitMQConfig 进行序列化
import org.springframework.amqp.core.Queue;
import org.springframework.amqp.support.converter.Jackson2JsonMessageConverter;
import org.springframework.amqp.support.converter.MessageConverter;
import org.springframework.context.annotation.Bean;
import org.springframework.context.annotation.Configuration;

import java.util.HashMap;
import java.util.Map;


/**
 * @author :hjx
 * @date :Created in 2022/3/28 11:38
 */
@Configuration
public class RabbitMQConfig {
    /**
     * 序列化
     * @return
     */
    @Bean
    public MessageConverter messageConverter(){
        return new Jackson2JsonMessageConverter();
    }
    /**
     * type  1 simple简单模式为一个队列中一条消息,只能被一个消费者消费。
     */
    @Bean
    public Queue simpleQueue(){
              // durable:是否持久化,默认是false,持久化队列:会被存储在磁盘上,当消息代理重启时仍然存在,暂存队列:当前连接有效
        // exclusive:默认也是false,只能被当前创建的连接使用,而且当连接关闭后队列即被删除。此参考优先级高于durable
        // autoDelete:是否自动删除,当没有生产者或者消费者使用此队列,该队列会自动删除。
        //   return new Queue("rabbitmq_simple",true,true,false);


        return new Queue("rabbitmq_simple",true,false,false);
    }

}
2.实现Work工作模式
定义Work队列
import org.springframework.amqp.core.Queue;
import org.springframework.amqp.support.converter.Jackson2JsonMessageConverter;
import org.springframework.amqp.support.converter.MessageConverter;
import org.springframework.context.annotation.Bean;
import org.springframework.context.annotation.Configuration;
import java.util.HashMap;
import java.util.Map;
/**
* @author :hjx
* @date :Created in 2022/3/28 11:38
*/
@Configuration
public class RabbitMQConfig {
/**
* 序列化
* @return
*/
@Bean
public MessageConverter messageConverter(){
return new Jackson2JsonMessageConverter();
}
/**
* type 1 simple简单模式为一个队列中一条消息,只能被一个消费者消费。
*/
@Bean
public Queue simpleQueue(){
// durable:是否持久化,默认是false,持久化队列:会被存储在磁盘上,当消息代理重启时仍然存在,暂存队列:当前连接有效
// exclusive:默认也是false,只能被当前创建的连接使用,而且当连接关闭后队列即被删除。此参考优先级高于durable
// autoDelete:是否自动删除,当没有生产者或者消费者使用此队列,该队列会自动删除。
// return new Queue("rabbitmq_simple",true,true,false);
return new Queue("rabbitmq_simple",true,false,false);
}
@Bean
public Queue workQueue(){
return new Queue("rabbitmq_work");
}
}
创建生产者
Map msgMap = new HashMap<>();
msgMap.put("key", "rabbitmq_work");
rabbitTemplate.convertAndSend("rabbitmq_work", msgMap);
创建消费者
@RabbitHandler
@RabbitListener(queues="rabbitmq_work" )
public void processWork(Map msgMap, Channel channel, @Header(AmqpHeaders.DELIVERY_TAG) long tag) {
System.out.println("消费者消费消息work=====" + msgMap.toString());
}
@RabbitHandler
@RabbitListener(queues="rabbitmq_work" )
public void processWork1(Map msgMap, Channel channel, @Header(AmqpHeaders.DELIVERY_TAG) long tag) {
System.out.print("消费者消费消息work111=====" + msgMap.toString());
}
通过调用可以发现 生产者发送的消息只能有一个消费者进行消费
3.实现publish/subscribe订阅模式 广播模式
定义交换机 和队列
import org.springframework.amqp.core.Binding;
import org.springframework.amqp.core.BindingBuilder;
import org.springframework.amqp.core.FanoutExchange;
import org.springframework.amqp.core.Queue;
import org.springframework.context.annotation.Bean;
import org.springframework.context.annotation.Configuration;
/**
* @author :hjx
* @date :Created in 2022/3/28 16:12
*/
/** type 3 publish/subscribe订阅模式为一个生产者发送的消息被多个消费者获取。
* type 4 routing路由模式为生产者发送的消息主要根据定义的路由规则决定往哪个队列发送。
* type 5 topic 主题模式为生产者,一个交换机(topicExchange),模糊匹配路由规则,多个队列,多个消费者。
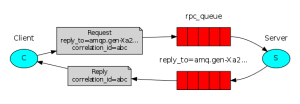
* type 6 RPC模式为客户端 Client 先发送消息到消息队列,远程服务端 Server 获取消息,然后再写入另一个消息队列,
向原始客户端 Client 响应消息处理结果
**/
@Configuration
public class FanoutConfig {
//声明交换机
@Bean
public FanoutExchange fanoutExchange(){
return new FanoutExchange("itcast.fanout");
}
//声明第一个队列
@Bean
public Queue fanoutQueue1(){
return new Queue("fanout.queue1");
}
//绑定队列1和交换机
@Bean
public Binding bindingQueue1(Queue fanoutQueue1, FanoutExchange fanoutExchange){
return BindingBuilder
.bind(fanoutQueue1)
.to(fanoutExchange);
}
//声明第一个队列
@Bean
public Queue fanoutQueue2(){
return new Queue("fanout.queue2");
}
//绑定队列2和交换机
@Bean
public Binding bindingQueue2(Queue fanoutQueue2, FanoutExchange fanoutExchange){
return BindingBuilder
.bind(fanoutQueue2)
.to(fanoutExchange);
}
}
创建生产者
Map msgMap = new HashMap<>();
//交换机
String exchangeName = "itcast.fanout";
//消息
msgMap.put("msg", "123");
rabbitTemplate.convertAndSend(exchangeName, "", msgMap);
创建消费者
@RabbitHandler
@RabbitListener(queues="fanout.queue1" )
public void processFanout(Map msgMap, Channel channel, @Header(AmqpHeaders.DELIVERY_TAG) long tag) {
try {
System.out.println("消费者消费消息fanout.queue1=====" + msgMap.toString());
channel.basicAck(tag,false);
} catch (IOException e) {
e.printStackTrace();
}
}
@RabbitHandler
@RabbitListener(queues="fanout.queue2" )
public void processFanout2(Map msgMap, Channel channel, @Header(AmqpHeaders.DELIVERY_TAG) long tag) {
try {
System.out.println("消费者消费消息fanout.queue2=====" + msgMap.toString());
channel.basicAck(tag,false);
} catch (IOException e) {
e.printStackTrace();
}
}
通过调用可以发现 生产者发送的消息 两个消费者都能接收
4.实现routing路由模式
定义交换机 和队列
import org.springframework.amqp.core.*;
import org.springframework.context.annotation.Bean;
import org.springframework.context.annotation.Configuration;
/**
* @author :hjx
* @date :Created in 2022/3/28 16:12
*/
@Configuration
public class DirectConfig {
//声明交换机
@Bean
public DirectExchange directExchange(){
return new DirectExchange("itcast.direct");
}
//声明第一个队列
@Bean
public Queue directQueue1(){
return new Queue("direct.queue1");
}
//绑定队列1和交换机
@Bean
public Binding directbindingQueue1(Queue directQueue1, DirectExchange directExchange){
return BindingBuilder
.bind(directQueue1)
.to(directExchange).with("blue");
}
//声明第一个队列
@Bean
public Queue directQueue2(){
return new Queue("direct.queue2");
}
//绑定队列2和交换机
@Bean
public Binding directbindingQueue2(Queue directQueue2, DirectExchange directExchange){
return BindingBuilder
.bind(directQueue2)
.to(directExchange).with("red");
}
}
创建生产者
Map msgMap = new HashMap<>();
//交换机
String exchangeName = "itcast.direct";
//消息
msgMap.put("msg", "blue");
rabbitTemplate.convertAndSend(exchangeName, "blue", msgMap);
创建消费者
//bindings 队列绑定
//Queue 队列
//Exchange 交换机
//key
@RabbitHandler
@RabbitListener(bindings =@QueueBinding(
value =@Queue(name="direct.queue1"),
exchange =@Exchange(name="itcast.direct",type = ExchangeTypes.DIRECT),
key = {"red","blue"}
))
public void processDirect1(Map msgMap, Channel channel, @Header(AmqpHeaders.DELIVERY_TAG) long tag) {
try {
System.out.println("消费者消费消息itcast.direct=====direct.queue1" + msgMap.toString());
channel.basicAck(tag,false);
} catch (IOException e) {
e.printStackTrace();
}
}
//bindings 队列绑定
//Queue 队列
//Exchange 交换机
//key
@RabbitHandler
@RabbitListener(bindings =@QueueBinding(
value =@Queue(name="direct.queue2"),
exchange =@Exchange(name="itcast.direct",type = ExchangeTypes.DIRECT),
key = {"red","yellow"}
))
public void processDirect2(Map msgMap, Channel channel, @Header(AmqpHeaders.DELIVERY_TAG) long tag) {
try {
System.out.println("消费者消费消息itcast.direct=====direct.queue2" + msgMap.toString());
channel.basicAck(tag,false);
} catch (IOException e) {
e.printStackTrace();
}
}
通过调用可以发现 传入 red 两个队列都能接收 blue只有一个队列能接收
5.topic 主题模式
定义交换机 和队列
import org.springframework.amqp.core.Binding;
import org.springframework.amqp.core.BindingBuilder;
import org.springframework.amqp.core.TopicExchange;
import org.springframework.amqp.core.Queue;
import org.springframework.context.annotation.Bean;
import org.springframework.context.annotation.Configuration;
/**
* @author :hjx
* @date :Created in 2022/3/28 16:12
*/
@Configuration
public class TopicConfig {
//声明交换机
@Bean
public TopicExchange topicExchange(){
return new TopicExchange("itcast.topic");
}
//声明第一个队列
@Bean
public Queue topicQueue1(){
return new Queue("topic.queue1");
}
//绑定队列1和交换机
@Bean
public Binding topicbindingQueue1(Queue topicQueue1, TopicExchange topicExchange){
return BindingBuilder
.bind(topicQueue1)
.to(topicExchange).with("china.#");
}
//声明第一个队列
@Bean
public Queue topicQueue2(){
return new Queue("topic.queue2");
}
//绑定队列2和交换机
@Bean
public Binding topicbindingQueue2(Queue topicQueue2, TopicExchange topicExchange){
return BindingBuilder
.bind(topicQueue2)
.to(topicExchange).with("#.news");
}
}
创建生产者
Map msgMap = new HashMap<>();
//交换机
String exchangeName = "itcast.topic";
//消息
msgMap.put("msg", "china.123");
rabbitTemplate.convertAndSend(exchangeName, "china.123", msgMap);
创建消费者
//#多个 *一个
@RabbitHandler
@RabbitListener(bindings =@QueueBinding(
value =@Queue(name="topic.queue1"),
exchange =@Exchange(name="itcast.topic",type = ExchangeTypes.TOPIC),
key = "china.#"
))
public void processTopic(Map msgMap, Channel channel, @Header(AmqpHeaders.DELIVERY_TAG) long tag) {
try {
System.out.println("消费者消费消息itcast.topic=====topic.queue1" + msgMap.toString());
channel.basicAck(tag,false);
} catch (IOException e) {
e.printStackTrace();
}
}
//#多个 *一个
@RabbitHandler
@RabbitListener(bindings =@QueueBinding(
value =@Queue(name="topic.queue2"),
exchange =@Exchange(name="itcast.topic",type = ExchangeTypes.TOPIC),
key = "#.news"
))
public void processTopic2(Map msgMap, Channel channel, @Header(AmqpHeaders.DELIVERY_TAG) long tag) {
try {
System.out.println("消费者消费消息itcast.topic=====topic.queue2" + msgMap.toString());
channel.basicAck(tag,false);
} catch (IOException e) {
e.printStackTrace();
}
}
通过调用可以发现 值进入了topic.queue1队列
rabbitmq发送一些配置
rabbitmq的消息发送 properties
a. content_type : 消息内容的类型 text/json
b. content_encoding: 消息内容的编码格式
c. priority: 消息的优先级
d. correlation_id:关联id
e. reply_to: 用于指定回复的队列的名称
f. expiration: 消息的失效时间
g. message_id: 消息id
h. timestamp:消息的时间戳
i. type: 类型
j. user_id: 用户id
k. app_id: 应用程序id
l. cluster_id: 集群id
m. Payload: 消息内容(必须是以字符串形式传入)
通过
Map msgMap = new HashMap<>();
msgMap.put("key", "rabbitmq_simple");
MessagePostProcessor msg = message -> {
message.getMessageProperties().getHeaders().put("da","123");
message.getMessageProperties().setExpiration("10000"); //失效时间
return message;
};
rabbitTemplate.convertAndSend("rabbitmq_simple", msgMap,msg );
消费者消息出现异常处理
1.可以开启重试
spring:
rabbitmq:
...
# 配置消息重试
listener:
simple:
retry:
# 开启重试
enabled: true
# 重试三次
max-attempts: 3
# 间隔时间1s
max-interval: 1000
2.绑定死信交换器
定义死信队列
import org.springframework.amqp.core.*;
import org.springframework.context.annotation.Bean;
import org.springframework.context.annotation.Configuration;
/**
* @author :hjx
* @date :Created in 2022/3/29 17:16
*/
@Configuration
public class DeadMq {
//声明交换机
@Bean
public DirectExchange deadExchange(){
return new DirectExchange("itcast.dead");
}
//声明第一个队列
@Bean
public Queue deadQueue1(){
return new Queue("dead.queue1");
}
//绑定队列2和交换机
@Bean
public Binding bindingQueue5(Queue deadQueue1, DirectExchange deadExchange){
return BindingBuilder
.bind(deadQueue1)
.to(deadExchange).with("dead");
}
}
定义队列的时候添加
@Bean
public Queue simpleQueue(){
// durable:是否持久化,默认是false,持久化队列:会被存储在磁盘上,当消息代理重启时仍然存在,暂存队列:当前连接有效
// exclusive:默认也是false,只能被当前创建的连接使用,而且当连接关闭后队列即被删除。此参考优先级高于durable
// autoDelete:是否自动删除,当没有生产者或者消费者使用此队列,该队列会自动删除。
Map map = new HashMap<>();
map.put("x-message-ttl",5000);
map.put("x-dead-letter-exchange","itcast.dead"); //死信队列
map.put("x-dead-letter-routing-key","dead");
return new Queue("rabbitmq_simple",true,false,false,map);
}
需要的配置可以通过rabbitmq的客户端查看